
- Chillispot 1.0 ลิ้งที่เกี่ยวข้อง http://www.chillispot.org/download/chillispot_1.0_i386.deb
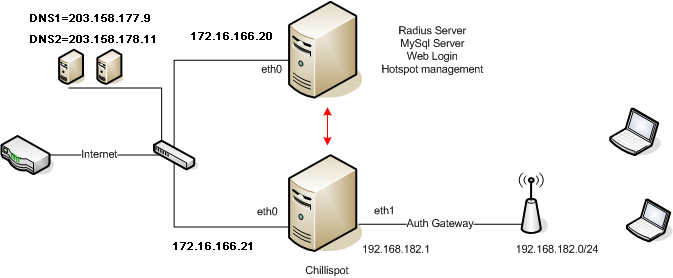
- การติดตั้ง chillispot จะต้องใช้การ์แลน 2 การ์ด
1. ปรับแต่งค่าของ Network ทำการ Enable packet forwarding ด้วยการแก้ไขไฟล์ /etc/sysctl.conf ด้วยการเอาเครื่องหมาย # หน้าคำว่า net.ipv4.ip_forward=1 ออก เพื่อสั่งให้ packet forwarding ของ ipv4 ทำงาน
2. สั่งให้ ubuntu เริ่มทำงานใหม่ด้วยคำสั่ง reboot
3. เปิดการทำงานของ TUN/TAP โดยการเพิ่มคำว่า tun ต่อท้ายไฟล์ /etc/modules และ
- สั่ง Enable ด้วยคำสั่ง modprobe tun
4. ติดตั้ง chillispot โดยใช้คำสั่ง
wget http://www.chillispot.org/download/chillispot_1.0_i386.deb
dpkg -i chillispot_1.0_i386.deb
5. ปรับแต่งการตั้งค่า chillispot โดยแก้ไฟล์ /etc/chilli.conf ดังตัวอย่างด้านล่าง
net 192.168.182.0/255.255.255.0
dynip 192.168.182.0/24
radiusserver1 172.16.166.20 # หากเครื่อง Chillispot เป็นเครื่องเดียวกับเครื่อง Radius Server สามารถใส่ 127.0.0.1
radiusserver2 172.16.166.20 # หากเครื่อง Chillispot เป็นเครื่องเดียวกับเครื่อง Radius Server สามารถใส่ 127.0.0.1
radiussecret testing123 #ค่าต้องเหมือน clients.conf ของ freeradius
dhcpif eth1
uamserver http://192.168.182.1/welcome/go/
uamhomepage http://192.168.182.1/welcome/login_page.html
uamsecret testsecret #ค่าต้องเหมือน config.php ของ Web Login
coaport=3779
coanoipcheck
-สั่งให้ Chillispot ทำงานใหม่ด้วยคำสั่ง /etc/init.d/chilli start
6. ปรับแต่ง Firewall สำหรับ Chillispot
cd /etc/init.d
wget https://www.dropbox.com/s/umdf3bbtl4hkcut/chilli.iptables
chmod a+x chilli.iptables
ln -s /etc/init.d/chilli.iptables /etc/rcS.d/S41chilli.iptables
7. ปรับปรุง firewall แก้ไฟล์ /etc/init.d/chilli.iptables
หากเครื่อง Chillispot เป็นเครื่องเดียวกับเครื่อง Radius Server ปรับแต่งให้ port 80 สามารถใช้งานจาก eth0 ได้
#Allow Port 80 to EXTIF Server (eth0)
$IPTABLES -A INPUT -i $EXTIF -p tcp -m tcp --dport 80 --syn -j ACCEPT
ข้อมูลตัวอย่าง iptables ทั้งหมด
IPTABLES="/sbin/iptables"
EXTIF="eth0"
INTIF="eth1"
#Flush all rules
$IPTABLES -F
$IPTABLES -F -t nat
$IPTABLES -F -t mangle
#Set default behaviour
$IPTABLES -P INPUT DROP
$IPTABLES -P FORWARD ACCEPT
$IPTABLES -P OUTPUT ACCEPT
#Allow related and established on all interfaces (input)
$IPTABLES -A INPUT -m state --state RELATED,ESTABLISHED -j ACCEPT
#Allow releated, established and ssh on $EXTIF. Reject everything else.
$IPTABLES -A INPUT -i $EXTIF -p tcp -m tcp --dport 22 --syn -j ACCEPT
#Allow Port 80 to EXTIF Server (eth0)
$IPTABLES -A INPUT -i $EXTIF -p tcp -m tcp --dport 80 --syn -j ACCEPT
$IPTABLES -A INPUT -i $EXTIF -j REJECT
#Allow related and established from $INTIF. Drop everything else.
$IPTABLES -A INPUT -i $INTIF -j DROP
#Allow http and https on other interfaces (input).
#This is only needed if authentication server is on same server as chilli
$IPTABLES -A INPUT -p tcp -m tcp --dport 80 --syn -j ACCEPT
$IPTABLES -A INPUT -p tcp -m tcp --dport 443 --syn -j ACCEPT
#Allow 3990 on other interfaces (input).
$IPTABLES -A INPUT -p tcp -m tcp --dport 3990 --syn -j ACCEPT
#Allow ICMP echo on other interfaces (input).
$IPTABLES -A INPUT -p icmp --icmp-type echo-request -j ACCEPT
#Allow everything on loopback interface.
$IPTABLES -A INPUT -i lo -j ACCEPT
# Drop everything to and from $INTIF (forward)
# This means that access points can only be managed from ChilliSpot
$IPTABLES -A FORWARD -i $INTIF -j DROP
$IPTABLES -A FORWARD -o $INTIF -j DROP
#Enable NAT on output device
$IPTABLES -t nat -A POSTROUTING -o $EXTIF -j MASQUERADE
8. ทำการ Enable firewall script ด้วยคำสั่ง
/etc/init.d/chilli.iptables
9. ปรับแต่ง freeradius เพื่ออนุญาตให้ ip เครื่อง chillispot สามารถ access เครื่อง radius server ได้
ไปยังเครื่อง radius server และแก้ไฟล์ /etc/freeradius/clients.conf และเพิ่มข้อความต่อไปนี้
client 192.168.0.11 { #หากเครื่อง Chillispot เป็นเครื่องเดียวกับเครื่อง Radius Server ก็ให้ใส่ ip เดียวกับ radius หรือใช้ secret ใน client localhost
secret = testing123 #ค่าต้องเหมือน chilli.conf ของ chillispot
shortname = private-network
}
สั่งงานให้ freeradius เริ่มทำงานใหม่ด้วยคำสั่ง service freeradius restart
ที่มา http://www.phuketadmin.org/index.php?topic=7212.0